3 Ways to Center Worksheet in Excel

Centering Worksheets in Excel: A Comprehensive Guide
When working with Excel, it’s essential to present your data in a clear and organized manner. One way to achieve this is by centering your worksheet. In this article, we’ll explore three ways to center a worksheet in Excel, making it easier to read and understand.
Method 1: Using the Page Layout Tab
The first method involves using the Page Layout tab in Excel. This method allows you to center your worksheet horizontally and vertically.
- Open your Excel workbook and select the worksheet you want to center.
- Click on the Page Layout tab in the ribbon.
- In the Page Setup group, click on the Margins button.
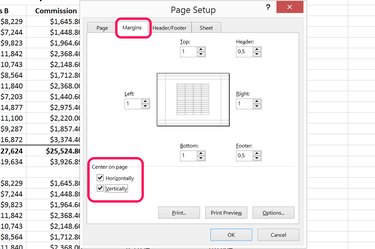
- In the Margins dialog box, select the Center on page option under the Horizontally and Vertically sections.
- Click OK to apply the changes.
By following these steps, your worksheet will be centered both horizontally and vertically.
Method 2: Using VBA Macro
The second method involves using a VBA macro to center your worksheet. This method is more advanced and requires some programming knowledge.
- Open your Excel workbook and press Alt + F11 to open the Visual Basic Editor.
- In the Visual Basic Editor, click Insert > Module to insert a new module.
- Paste the following code into the module:
Sub CenterWorksheet()
    With ActiveSheet.PageSetup
       .LeftMargin = 0
       .RightMargin = 0
       .TopMargin = 0
       .BottomMargin = 0
       .CenterHorizontally = True
       .CenterVertically = True
    End With
End Sub
- Click Run > Run Sub/UserForm to run the macro.
- Save your workbook to save the macro.
This macro will center your worksheet both horizontally and vertically.
Method 3: Using Excel’s Built-in Feature
The third method involves using Excel’s built-in feature to center your worksheet. This method is the simplest and most straightforward.
- Open your Excel workbook and select the worksheet you want to center.
- Click on the File tab in the ribbon.
- Click on Print and then select Print Preview.
- In the Print Preview window, click on the Page Setup button.
- In the Page Setup dialog box, select the Center on page option under the Horizontally and Vertically sections.
- Click OK to apply the changes.
By following these steps, your worksheet will be centered both horizontally and vertically.
📝 Note: These methods will center your worksheet on the page, but not necessarily on the screen. To center your worksheet on the screen, you may need to adjust the zoom level or use a different method.
Comparison of Methods

| Method | Ease of Use | Flexibility | Complexity |
|---|---|---|---|
| Method 1 | Easy | Medium | Low |
| Method 2 | Advanced | High | High |
| Method 3 | Easy | Low | Low |
Conclusion
Centering your worksheet in Excel can make it easier to read and understand. The three methods outlined in this article provide different approaches to achieving this goal. Method 1 uses the Page Layout tab, Method 2 uses a VBA macro, and Method 3 uses Excel’s built-in feature. By choosing the method that best fits your needs, you can create a more visually appealing and organized worksheet.
What is the difference between centering a worksheet horizontally and vertically?
+Centering a worksheet horizontally means adjusting the margins so that the worksheet is centered from left to right. Centering a worksheet vertically means adjusting the margins so that the worksheet is centered from top to bottom.
Can I center a worksheet using a keyboard shortcut?
+No, there is no keyboard shortcut to center a worksheet in Excel. However, you can use the methods outlined in this article to achieve this goal.
Will centering a worksheet affect the data or formatting?
+No, centering a worksheet will not affect the data or formatting. It will only adjust the margins to center the worksheet on the page.
Related Terms:
- Excel create a report
- Document properties Excel


