Free Body Diagrams Worksheet for Physics Students

Understanding the Concept of Free Body Diagrams
Free body diagrams are a crucial tool in physics, allowing students to visualize and analyze the forces acting on an object. By creating a simplified representation of an object and the forces acting on it, students can better understand the relationships between forces and motion. In this worksheet, we will explore the concept of free body diagrams and how to apply them to solve physics problems.
What is a Free Body Diagram?
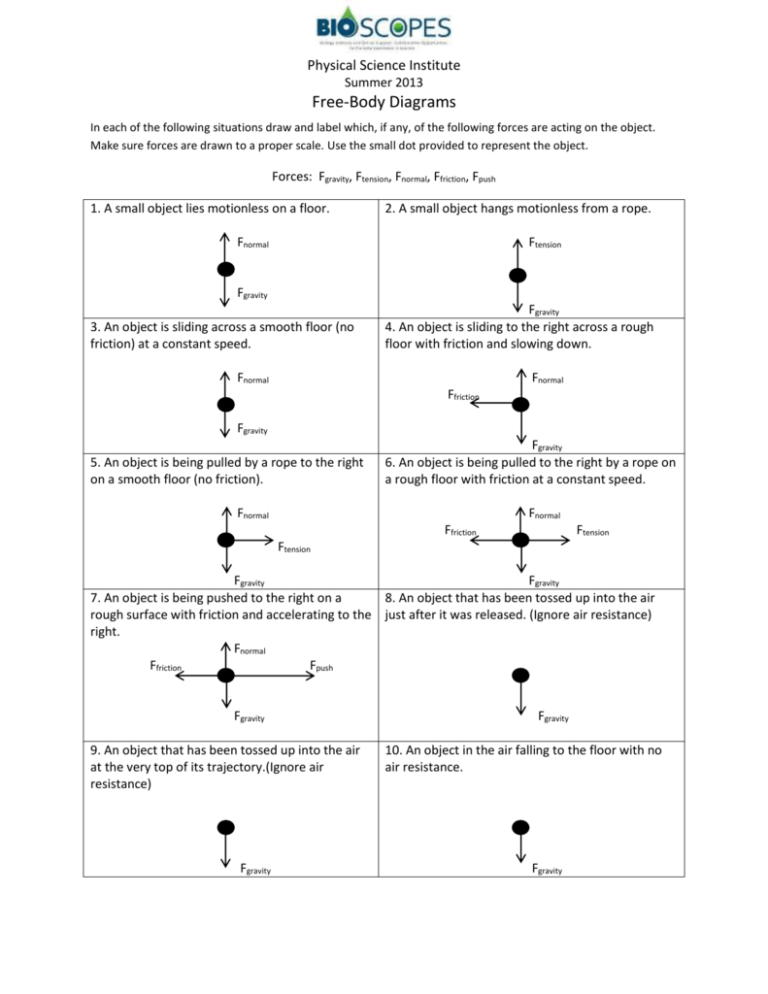
A free body diagram is a graphical representation of an object, showing all the forces acting on it. The diagram is called “free” because it is not a drawing of the actual object, but rather a simplified representation of the object and the forces acting on it. Free body diagrams are essential in physics, as they help students to:
- Identify the forces acting on an object
- Determine the net force acting on an object
- Analyze the relationships between forces and motion
Components of a Free Body Diagram
A free body diagram typically consists of the following components:
- The object: Represented by a simple shape, such as a rectangle or a circle
- Forces: Represented by arrows, which indicate the direction and magnitude of the force
- Axes: The x and y axes, which provide a reference frame for the diagram
Types of Forces
There are several types of forces that can act on an object, including:
- Gravity: The force of gravity acting on an object, represented by an arrow pointing downwards
- Normal force: The force exerted by a surface on an object, represented by an arrow pointing perpendicular to the surface
- Friction: The force opposing the motion of an object, represented by an arrow pointing opposite to the direction of motion
- Tension: The force exerted by a string or rope on an object, represented by an arrow pointing along the length of the string or rope
How to Draw a Free Body Diagram
Drawing a free body diagram involves the following steps:
- Identify the object: Determine the object being analyzed and represent it by a simple shape.
- Identify the forces: Determine the forces acting on the object and represent them by arrows.
- Label the forces: Label each force with its corresponding symbol, such as “Fg” for gravity or “Fn” for normal force.
- Draw the axes: Draw the x and y axes, which provide a reference frame for the diagram.
Examples of Free Body Diagrams
The following examples illustrate the concept of free body diagrams:
Example 1: A Box on a Table
A box is placed on a table, and the forces acting on it are:
- Gravity (Fg)
- Normal force (Fn)
The free body diagram for this example would show the box as a rectangle, with an arrow pointing downwards to represent the force of gravity and an arrow pointing upwards to represent the normal force.
Example 2: A Block on an Inclined Plane
A block is placed on an inclined plane, and the forces acting on it are:
- Gravity (Fg)
- Normal force (Fn)
- Friction (Ff)
The free body diagram for this example would show the block as a rectangle, with an arrow pointing downwards to represent the force of gravity, an arrow pointing perpendicular to the plane to represent the normal force, and an arrow pointing opposite to the direction of motion to represent the frictional force.
Tips for Solving Problems Using Free Body Diagrams
The following tips can help you to solve physics problems using free body diagrams:
- Identify the forces: Determine the forces acting on the object and represent them by arrows.
- Label the forces: Label each force with its corresponding symbol.
- Draw the axes: Draw the x and y axes, which provide a reference frame for the diagram.
- Analyze the forces: Analyze the forces acting on the object and determine the net force acting on it.
- Use Newton’s laws: Use Newton’s laws to analyze the motion of the object and solve the problem.
Practice Exercises
The following exercises will help you to practice drawing free body diagrams and solving physics problems:
- A book is placed on a table. Draw a free body diagram showing the forces acting on the book.
- A block is placed on an inclined plane. Draw a free body diagram showing the forces acting on the block.
- A car is moving along a straight road. Draw a free body diagram showing the forces acting on the car.
p class=“pro-note”>[💡] Note: When drawing a free body diagram, it is essential to identify all the forces acting on the object and represent them by arrows. Label each force with its corresponding symbol, and draw the axes to provide a reference frame for the diagram.
Conclusion
Free body diagrams are a powerful tool in physics, allowing students to visualize and analyze the forces acting on an object. By following the steps outlined in this worksheet, students can learn to draw free body diagrams and use them to solve physics problems. Remember to identify all the forces acting on the object, label each force with its corresponding symbol, and draw the axes to provide a reference frame for the diagram.
FAQ Section
What is a free body diagram?
+A free body diagram is a graphical representation of an object, showing all the forces acting on it.
What are the components of a free body diagram?
+A free body diagram typically consists of the object, forces, and axes.
How do I draw a free body diagram?
+To draw a free body diagram, identify the object, identify the forces acting on it, label each force with its corresponding symbol, and draw the axes.
Related Terms:
- Free body diagram Worksheet PDF
- free-body diagrams worksheet answers
- Free body diagram Maker
- free body diagram answer key
- physics free body diagram practice
- free body diagram practice package


